Capture the Flag (CTF) exercises can be used to help gauge knowledge, and develop new skills. This article is going to be looking at setting up a virtual network environment to host a CTF exercise.
In part one, we’re going to create a network of computer systems using a Proxmox VE hypervisor and Terraform. In part two, we will cover adding in vulnerabilities using Ansible.
Although you could manually set everything up, using orchestration tools will allow for quicker deployment.
We will be using templates to speed up provisioning. In Proxmox a template is a pre-configured virtual machine (VM) or container (CT) image that can be used as a base to quickly deploy multiple instances of the same configuration.
Linux Virtual Machine Templates
Download an Ubuntu cloud image from https://cloud-images.ubuntu.com/releases/noble/release/ and upload the image to the Proxmox data store.
Ubuntu cloud images have cloud-init enabled. This system allows the hypervisor to write common settings to an ISO file that the guest operating system uses on first boot. It unfortunately does not include the qemu-guest-agent package we need. This can be added into the image using the virt-customize command.
root@pve:~# apt install libguestfs-tools
root@pve:~# virt-customize -a /var/lib/vz/template/iso/ubuntu-24.04-server-cloudimg-amd64.img --install qemu-guest-agent
[   0.0] Examining the guest ...
[   6.2] Setting a random seed
virt-customize: warning: random seed could not be set for this type of
guest
[   6.2] Setting the machine ID in /etc/machine-id
[   6.2] Installing packages: qemu-guest-agent
[  44.2] Finishing off
In addition, we will modify the image to allow for password based SSH logins. This can be done using the virt-edit command.
virt-edit /var/lib/vz/template/iso/ubuntu-24.04-server-cloudimg-amd64.img /etc/cloud/cloud.cf
# The top level settings are used as module
# and base configuration.

# A set of users which may be applied and/or used by various modules
# when a 'default' entry is found it will reference the 'default_user'
# from the distro configuration specified below
users:
  - default

ssh_pwauth: True

# If this is set, 'root' will not be able to ssh in and they
# will get a message to login instead as the default $user
disable_root: false
Also delete the /etc/machine-id file using virt-edit. This will prevent duplicate DHCP leases.
virt-edit /var/lib/vz/template/iso/ubuntu-24.04-server-cloudimg-amd64.img /etc/machine-id
***delete contents***
To create our template, connect to Proxmox using SSH and use the following commands. This assumes the Ubuntu image has already been uploaded to the systems data store.
qm create 301 --name "ubuntu-24.04-cloud-init-template" --memory 2048 --cores 2 --net0 virtio,bridge=vmbr0
qm importdisk 301 /var/lib/vz/template/iso/ubuntu-24.04-server-cloudimg-amd64.img local-lvm
qm set 301 --scsihw virtio-scsi-pci --scsi0 local-lvm:vm-301-disk-0
qm set 301 --boot c --bootdisk scsi0
qm set 301 --ide2 local-lvm:cloudinit
qm set 301 --ipconfig0 ip=dhcp
qm set 301 --ciuser bordergate --cipassword 'Password1'
qm template 301
Create a new virtual machine based on this template using the following command.
root@pve:~# qm clone 301 201 --name "ubuntu-vm-1"
create full clone of drive ide2 (local-lvm:vm-301-cloudinit)
  Logical volume "vm-201-cloudinit" created.
create linked clone of drive scsi0 (local-lvm:base-301-disk-0)
  Logical volume "vm-201-disk-0" created.
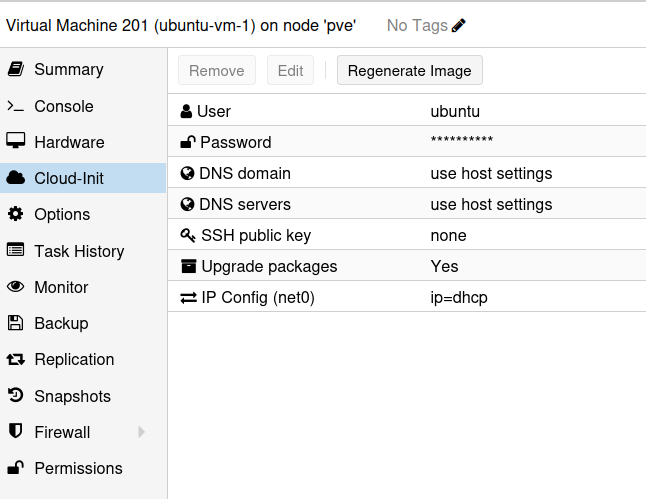
Viewing the virtual machine on the Proxmox web interface, you should see we have a cloud-init tab that can be used to configure the systems credentials and IP addresses.
Linux Container Templates
We will use a single container as a DHCP server. This can be created and configured using the following commands.
pct create 300 /var/lib/vz/template/cache/debian-12-standard_12.7-1_amd64.tar.zst -hostname dhcp-container-template -rootfs local-lvm:8 -memory 1024 -cores 2 -net0 name=eth0,bridge=vmbr1,ip=192.168.24.254/24,gw=192.168.24.1
pct start 300
pct exec 300 -- sh -c 'echo "root:Password1" | chpasswd'
pct exec 300 -- sh -c 'apt update'
pct exec 300 -- sh -c 'apt install -y isc-dhcp-server'
pct exec 300 -- sh -c 'echo "INTERFACESv4=\"eth0\"" | tee /etc/default/isc-dhcp-server'
pct exec 300 -- sh -c 'echo "subnet 192.168.24.0 netmask 255.255.255.0 {" | tee -a /etc/dhcp/dhcpd.conf'
pct exec 300 -- sh -c 'echo "  range 192.168.24.40 192.168.24.120;" | tee -a /etc/dhcp/dhcpd.conf'
pct exec 300 -- sh -c 'echo "  option routers 192.168.24.1;" | tee -a /etc/dhcp/dhcpd.conf'
pct exec 300 -- sh -c 'echo "  option domain-name-servers 8.8.8.8, 8.8.4.4;" | tee -a /etc/dhcp/dhcpd.conf'
pct exec 300 -- sh -c 'echo "  default-lease-time 28800;" | tee -a /etc/dhcp/dhcpd.conf'
pct exec 300 -- sh -c 'echo "  max-lease-time 86400;" | tee -a /etc/dhcp/dhcpd.conf'
pct exec 300 -- sh -c 'echo "}" | tee -a /etc/dhcp/dhcpd.conf'
pct exec 300 -- systemctl restart isc-dhcp-server
pct stop 300
pct template 300
Windows Virtual Machine Templates
Setting up Windows templates is a more involved process. First, create a 32GB disk for the virtual machine.
root@pve:~# pvesm alloc local-lvm 302 vm-302-disk-0 32G
  Logical volume "vm-302-disk-0" created.
successfully created 'local-lvm:vm-302-disk-0'
Windows systems running on Proxmox require the virtio drivers to even install the operating system. You can download an ISO that includes these drivers from here.
Use the following command to create the virtual machine.
root@pve:~# qm create 302 --name windows-2022-cloud-init-template --memory 4096 \
--cores 4 --net0 virtio,bridge=vmbr0 --cdrom /var/lib/vz/template/iso/SERVER_2022_EVAL_x64FRE_en-us.iso \
--ostype win11 --scsihw virtio-scsi-pci --virtio0 local-lvm:vm-302-disk-0,size=32G \
--sockets 1 --ide3 /var/lib/vz/template/iso/virtio-win-0.1.271.iso
pinning machine type to 'pc-i440fx-9.2+pve1' for Windows guest OS
Start the virtual machine, and when the Windows installer prompts you to find a storage driver, select E:\viostor\w11\amd64\viostor.inf.
Once the virtual machine has rebooted, install the other virtio drivers by running E:\virtio-win-gt-x64.msi, and the guest agent by running E:\virtio-win-guest-tools.exe. Install any required Windows updates, disable the systems firewall and reboot the system.
Cloudbase-Init
Windows does not natively support cloud-init, but you can configure it using the third-party software Cloudbase-Init. However, using this with Proxmox comes with some limitations. We will be able to configure the systems hostname and IP address, but configuring account passwords won’t be possible. This is because Proxmox will always supply a UNIX encrypted password, whereas cloudbase-init expects a plaintext password for Windows.
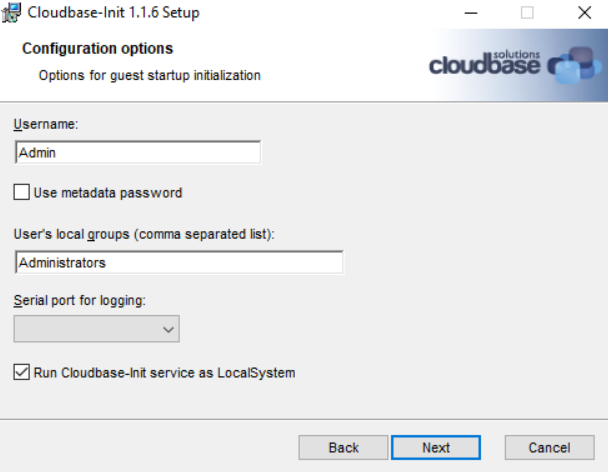
Download Cloudbase-init from here, set it to run as Local System, uncheck “use metadata password” and leave username as “admin”.
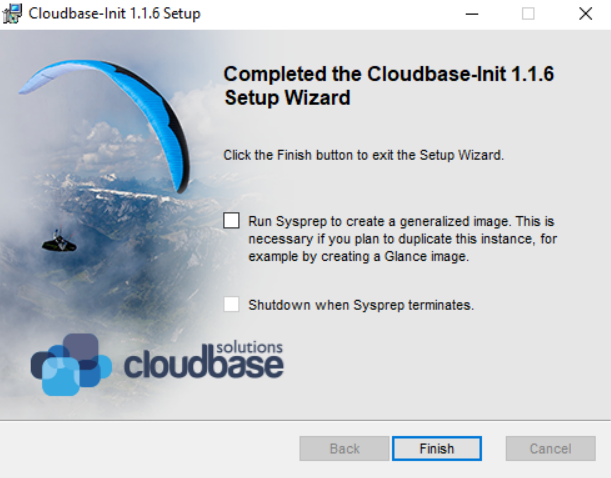
Ensure you un-check both boxes in the final step.
Windows systems have unique system identifiers (SID values). If we cloned the machine, we would have systems with duplicate SID’s on the network, and this would lead to problems. We can use the sysprep command to randomise the machine identifier values and prevent that from happening.
Create C:\Windows\Panther\unattend.xml with the following contents.
<?xml version="1.0" encoding="utf-8"?>
<unattend xmlns="urn:schemas-microsoft-com:unattend">
    <settings pass="oobeSystem">
        <component name="Microsoft-Windows-Shell-Setup" processorArchitecture="wow64" publicKeyToken="31bf3856ad364e35" language="neutral" versionScope="nonSxS" xmlns:wcm="http://schemas.microsoft.com/WMIConfig/2002/State" xmlns:xsi="http://www.w3.org/2001/XMLSchema-instance">
            <UserAccounts>
                <AdministratorPassword>
                    <Value>UABhAHMAcwB3AG8AcgBkADEAQQBkAG0AaQBuAGkAcwB0AHIAYQB0AG8AcgBQAGEAcwBzAHcAbwByAGQA</Value>
                    <PlainText>false</PlainText>
                </AdministratorPassword>
            </UserAccounts>
        </component>
        <component name="Microsoft-Windows-Shell-Setup" processorArchitecture="amd64" publicKeyToken="31bf3856ad364e35" language="neutral" versionScope="nonSxS" xmlns:wcm="http://schemas.microsoft.com/WMIConfig/2002/State" xmlns:xsi="http://www.w3.org/2001/XMLSchema-instance">
            <OOBE>
                <HideEULAPage>true</HideEULAPage>
                <HideOEMRegistrationScreen>true</HideOEMRegistrationScreen>
                <HideOnlineAccountScreens>true</HideOnlineAccountScreens>
                <SkipMachineOOBE>true</SkipMachineOOBE>
                <SkipUserOOBE>true</SkipUserOOBE>
            </OOBE>
        </component>
    </settings>
    <cpi:offlineImage cpi:source="catalog:c:/iso/sources/install_windows server 2022 serverdatacenter.clg" xmlns:cpi="urn:schemas-microsoft-com:cpi" />
</unattend>
This configuration will ensure the local administrator password is set to “Password1”, and skip any EULA checks.
Apply the configuration using;
C:\Windows\System32\Sysprep\sysprep.exe /oobe /generalize /shutdown /unattend:C:\Windows\Panther\unattend.xml
The system should shutdown, ready for being converted into a template.
If SysPrep fails at this stage, this Microsoft support article may offer the solution.
Next, we need to convert the image to a template.
root@pve:~# qm template 302
  Renamed "vm-302-disk-0" to "base-302-disk-0" in volume group "pve"
  Logical volume pve/base-302-disk-0 changed.
  WARNING: Combining activation change with other commands is not advised.
To configure the template using Proxmox, we will need to create a mount a new cloud-init drive. The reason this was not done earlier is when a VM is converted to a template, the drive would be removed.
root@pve:~# pvesm alloc local-lvm 302 vm-302-cloudinit 4G
Logical volume "vm-302-cloudinit" created.
successfully created 'local-lvm:vm-302-cloudinit'
root@pve:~# qm set 302 --ide2 local-lvm:vm-302-cloudinit,media=disk
update VM 302: -ide2 local-lvm:vm-302-cloudinit,media=disk
generating cloud-init ISO
Finally, create a cloned image based on the template.
root@pve:~# qm clone 302 202 --name "windows-vm-1"
create full clone of drive ide2 (local-lvm:vm-302-cloudinit)
  Logical volume "vm-202-cloudinit" created.
create linked clone of drive virtio0 (local-lvm:base-302-disk-0)
  Logical volume "vm-202-disk-0" created.
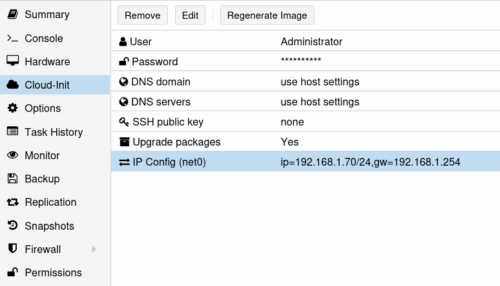
In the VM settings, you can now populate the cloud-init information. Make sure you click regenerate image after doing this, then boot the machine.
Networking Configuration
We will use three virtual bridge interfaces to host the systems in the CTF. Add the following configuration to /etc/network/interfaces on the Proxmox host. The first IP address in each subnet will act as a gateway address that will provide Internet access.
auto vmbr1
iface vmbr1 inet static
	address 192.168.100.1/24
	bridge-ports none
	bridge-stp off
	bridge-fd 0
        post-up   echo 1 > /proc/sys/net/ipv4/ip_forward
        post-up   iptables -t nat -A POSTROUTING -s '192.168.24.0/24' -o vmbr0 -j MASQUERADE
        post-down iptables -t nat -D POSTROUTING -s '192.168.24.0/24' -o vmbr0 -j MASQUERADE

auto vmbr2
iface vmbr2 inet static
	address 172.16.24.1/24
	bridge-ports none
	bridge-stp off
	bridge-fd 0
        post-up   echo 1 > /proc/sys/net/ipv4/ip_forward
        post-up   iptables -t nat -A POSTROUTING -s '172.16.24.0/24' -o vmbr0 -j MASQUERADE
        post-down iptables -t nat -D POSTROUTING -s '172.16.24.0/24' -o vmbr0 -j MASQUERADE

auto vmbr3
iface vmbr3 inet static
	address 10.0.0.1/24
	bridge-ports none
	bridge-stp off
	bridge-fd 0
        post-up   echo 1 > /proc/sys/net/ipv4/ip_forward
        post-up   iptables -t nat -A POSTROUTING -s '10.0.24.0/24' -o vmbr0 -j MASQUERADE
        post-down iptables -t nat -D POSTROUTING -s '10.0.24.0/24' -o vmbr0 -j MASQUERADE
Terraform
Now we have templates in place for Linux and Windows systems, we can use Terraform to deploy systems on mass.
You will need to remove the cloud-init drive we attached to the templates, as Terraform will add it’s own.
qm set 301 --ide2 none
update VM 301: -ide2 none
  Logical volume "vm-301-cloudinit" successfully removed.
qm set 302 --ide2 none
update VM 302: -ide2 none
  Logical volume "vm-302-cloudinit" successfully removed.
We need to create three files to get this working. provider.tf specifies how we connect to the hypervisor.
provider.tf
terraform {
  required_providers {
    proxmox = {
      source  = "telmate/proxmox"
      version = "3.0.1-rc4"
    }
  }
}

provider "proxmox" {
    pm_tls_insecure = true
    pm_api_url = "https://192.168.1.201:8006/api2/json"
    pm_password = "YourPassword"
    pm_user = "root@pam"
}
dhcp.tf
dhcp.tf define the DHCP server container we will be running on the first network.
resource "proxmox_lxc" "dhcp" {
  vmid        = 501
  hostname    = "N1-DHCP"
  target_node = "pve"
  pool        = "CTF"
  clone       = 300
  cores       = 2
  memory      = 1024
  swap        = 501
  start       = true

  network {
    name = "eth0"
    bridge = "vmbr1"
    ip     = "192.168.24.254/24"
  }

  rootfs {
    storage = "local-lvm"
    size    = "8G"
  }
}
main.tf
main.tf describes the hardware specifications were going to be deploying.
resource "proxmox_vm_qemu" "bordergate-ctf" {
    depends_on = [proxmox_lxc.dhcp_server]

    for_each    = { for vm in var.vm_config : vm.hostname => vm }

    name = each.value.hostname
    pool = "CTF"
    desc = "BORDERGATE CTF"
    target_node = "pve"
    clone = each.value.clone
    agent = 1
    os_type = "cloud-init"
    cores = 2
    memory = each.value.memory
    scsihw = "virtio-scsi-pci"
    vmid   = each.value.vmid
    onboot = true
    ciuser    = "bordergate"
    cipassword = "Password1"

  dynamic "disks" {

    for_each = each.value.os_type == "linux" ? [1] : []
    content {

      ide {
        ide3 {
          cloudinit {
            storage = "local-lvm"
          }
        }
      }

      scsi {
        scsi0 {
          disk {
            size            = 8
            cache           = "writeback"
            storage         = "local-lvm"
            discard         = true
          }
        }
      }
    }
  }

  dynamic "disks" {
    for_each = each.value.os_type == "windows" ? [1] : []
    content {
      ide {
        ide3 {
          cloudinit {
            storage = "local-lvm"
          }
        }
      }

      virtio {
        virtio0 {
          disk {
            size            = 32
            cache           = "writeback"
            storage         = "local-lvm"
            discard         = true
          }
        }
      }
    }
  }

    dynamic "network" {
      for_each = each.value.networks
      content {
        model  = "virtio"
        bridge = network.value.bridge
      }
    }

    boot = each.value.boot
    ipconfig0 = "ip=${each.value.networks[0].ip}"
    ipconfig1 = length(each.value.networks) > 1 ? "ip=${each.value.networks[1].ip}" : null
    ipconfig2 = length(each.value.networks) > 2 ? "ip=${each.value.networks[2].ip}" : null
    ipconfig3 = length(each.value.networks) > 3 ? "ip=${each.value.networks[3].ip}" : null


}
variables.tf
Finally, a variables.tf file can be used to specify the systems we’re going to deploy.
variable "vm_config" {
  description = "List of VM configurations"
  type = list(object({
    hostname   = string
    ip         = string
    memory     = number
    bridge     = string
    clone      = string
    vmid       = number
    boot       = string
    os_type    = string
    networks   = list(object({
    bridge = string
    ip     = string
    }))
  }))

  default = [

    #########################################################
    #                                                       #
    #                         NETWORK 1                     #
    #                                                       #
    #########################################################

    {
      hostname = "N1-ZEUS"
      ip       = "dhcp"
      memory   = 1024
      bridge   = "vmbr0"
      clone    = "ubuntu-24.04-cloud-init-template"
      vmid     = 502
      boot     = "order=scsi0"
      os_type  = "linux"
      networks = [
        { bridge = "vmbr1", ip = "dhcp" },
        { bridge = "vmbr2", ip = "172.16.24.7/24"}
      ]
    },
    {
      hostname = "N1-HERA"
      ip       = "dhcp"
      memory   = 1024
      bridge   = "vmbr0"
      clone    = "ubuntu-24.04-cloud-init-template"
      vmid     = 503
      boot     = "order=scsi0"
      os_type  = "linux"
      networks = [
        { bridge = "vmbr1", ip = "dhcp" },
        { bridge = "vmbr2", ip = "172.16.24.28/24"}

      ]
    },
    {
      hostname = "N1-ARES"
      ip       = "dhcp"
      memory   = 4096
      bridge   = "vmbr0"
      clone    = "windows-2022-cloud-init-template"
      boot     = "order=virtio0"
      vmid     = 504
      os_type  = "windows"
            networks = [
        { bridge = "vmbr1", ip = "dhcp" },
        { bridge = "vmbr2", ip = "172.16.24.88/24"}

      ]
    },
    {
      hostname = "N1-AEOLUS"
      ip       = "dhcp"
      memory   = 1024
      bridge   = "vmbr0"
      clone    = "ubuntu-24.04-cloud-init-template"
      vmid     = 505
      boot     = "order=scsi0"
      os_type  = "linux"
      networks = [
        { bridge = "vmbr1", ip = "dhcp" },
        { bridge = "vmbr2", ip = "172.16.24.99/24"}

      ]
    },


    #########################################################
    #                                                       #
    #                         NETWORK 2                     #
    #                                                       #
    #########################################################

    {
      hostname = "N2-DEMETER"
      ip       = "172.16.24.70/24"
      memory   = 4096
      bridge   = "vmbr0"
      clone    = "windows-2022-cloud-init-template"
      boot     = "order=virtio0"
      vmid     = 506
      os_type  = "windows"
            networks = [
        { bridge = "vmbr2", ip = "172.16.24.70/24" },
        { bridge = "vmbr3", ip = "10.0.24.22/24" }

      ]
    },

    {
      hostname = "N2-HERMES"
      ip       = "172.16.24.55/24"
      memory   = 1024
      bridge   = "vmbr0"
      clone    = "ubuntu-24.04-cloud-init-template"
      vmid     = 507
      boot     = "order=scsi0"
      os_type  = "linux"
      networks = [
        { bridge = "vmbr2", ip = "172.16.24.55/24" },
        { bridge = "vmbr3", ip = "10.0.24.23/24" }
      ]
    },
    {
      hostname = "N2-APOLLO"
      ip       = "172.16.24.75/24"
      memory   = 4096
      bridge   = "vmbr0"
      clone    = "windows-2022-cloud-init-template"
      boot     = "order=virtio0"
      vmid     = 508
      os_type  = "windows"
            networks = [
        { bridge = "vmbr2", ip = "172.16.24.75/24" },
        { bridge = "vmbr3", ip = "10.0.24.24/24" }

      ]
    },
    {
      hostname = "N2-HADES"
      ip       = "172.16.24.24/24"
      memory   = 1024
      bridge   = "vmbr0"
      clone    = "ubuntu-24.04-cloud-init-template"
      vmid     = 509
      boot     = "order=scsi0"
      os_type  = "linux"
      networks = [
        { bridge = "vmbr2", ip = "172.16.24.24/24" },
        { bridge = "vmbr3", ip = "10.0.24.25/24" }

      ]
    },

    #########################################################
    #                                                       #
    #                         NETWORK 3                     #
    #                                                       #
    #########################################################
    {
      hostname = "N3-PROMETHEUS"
      ip       = "10.0.0.2/24"
      memory   = 1024
      bridge   = "vmbr0"
      clone    = "ubuntu-24.04-cloud-init-template"
      vmid     = 510
      boot     = "order=scsi0"
      os_type  = "linux"
      networks = [
        { bridge = "vmbr3", ip = "10.0.24.2/24" },
      ]
    },
    {
      hostname = "N3-ARTEMIS"
      ip       = "10.0.0.77/24"
      memory   = 4096
      bridge   = "vmbr0"
      clone    = "windows-2022-cloud-init-template"
      boot     = "order=virtio0"
      vmid     = 511
      os_type  = "windows"
            networks = [
        { bridge = "vmbr3", ip = "10.0.24.77/24" }
      ]
    }

  ]
}
We will also create a separate Terraform file for a “director” system. This host will be responsible for running Ansible scripts to configure the hosts. As such, it needs to be connected to every network. I’ve put it in a separate file since we probably don’t want to destroy it every time the lab is reconfigured.
resource "proxmox_vm_qemu" "director" {
  name        = "DIRECTOR"
  pool        = "CTF"
  desc        = "BORDERGATE CTF - Director"
  target_node = "pve"
  clone       = "ubuntu-24.04-cloud-init-template"
  agent       = 1
  os_type     = "cloud-init"
  cores       = 2
  memory      = 1024
  scsihw      = "virtio-scsi-pci"
  vmid        = 500
  onboot      = true
  ciuser      = "bordergate"
  cipassword  = "Password1"
  boot        = "order=scsi0"

  disks {
    ide {
      ide3 {
        cloudinit {
          storage = "local-lvm"
        }
      }
    }

    scsi {
      scsi0 {
        disk {
          size    = 8
          cache   = "writeback"
          storage = "local-lvm"
          discard = true
        }
      }
    }
  }

  network {
    model  = "virtio"
    bridge = "vmbr0"
  }

  network {
    model  = "virtio"
    bridge = "vmbr1"
  }

  network {
    model  = "virtio"
    bridge = "vmbr2"
  }

  network {
    model  = "virtio"
    bridge = "vmbr3"
  }

  ipconfig0 = "ip=dhcp"
  ipconfig1 = "ip=192.168.24.250/24"
  ipconfig2 = "ip=172.16.24.250/24"
  ipconfig3 = "ip=10.0.24.250/24"
}
Run terraform apply to create the resources.
terraform apply
Do you want to perform these actions?
  Terraform will perform the actions described above.
  Only 'yes' will be accepted to approve.

  Enter a value: yes

Plan: 10 to add, 0 to change, 0 to destroy.
proxmox_vm_qemu.bordergate-ctf["N1-ZEUS"]: Creating...
proxmox_vm_qemu.bordergate-ctf["N2-APOLLO"]: Creating...
proxmox_vm_qemu.bordergate-ctf["N2-DEMETER"]: Creating...
proxmox_vm_qemu.bordergate-ctf["N1-ARES"]: Creating...
proxmox_vm_qemu.bordergate-ctf["N2-ARTEMIS"]: Creating...
proxmox_vm_qemu.bordergate-ctf["N1-HERA"]: Creating...
proxmox_vm_qemu.bordergate-ctf["N2-HERMES"]: Creating...
proxmox_vm_qemu.bordergate-ctf["N2-HADES"]: Creating...
proxmox_vm_qemu.bordergate-ctf["N3-PROMETHEUS"]: Creating...
proxmox_vm_qemu.bordergate-ctf["N1-ATHENA"]: Creating...
proxmox_vm_qemu.bordergate-ctf["N1-ZEUS"]: Still creating... [00m10s elapsed]
proxmox_vm_qemu.bordergate-ctf["N2-APOLLO"]: Still creating... [00m10s elapsed]
proxmox_vm_qemu.bordergate-ctf["N2-DEMETER"]: Still creating... [00m10s elapsed]
....

Apply complete! Resources: 10 added, 0 changed, 0 destroyed.
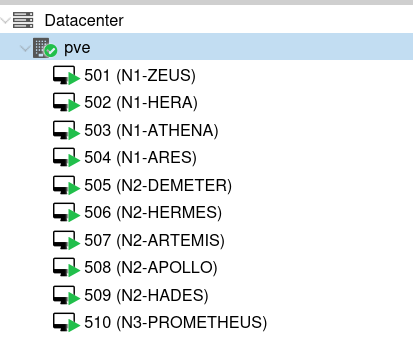
You should then see all the virtual machines appear in the Proxmox console.
In Conclusion
At this point, we have a set of computers spread across three virtual networks. In the next part, we will be looking at adding vulnerabilities using Ansible.